Post-renovation cleaning is nothing like regular housekeeping. Your newly renovated Seattle home has specialty surfaces that demand specific care, and one wrong cleaning product can damage finishes that cost thousands to install.
We at Bumble Bee Cleaning Services know that specialty surface cleaning after renovation requires knowledge most homeowners don’t have. This guide walks you through identifying what you’re dealing with, the right cleaning methods, and the mistakes that cause permanent damage.
What Surfaces Need Special Attention After Your Renovation
Hardwood Floors and Stone Countertops
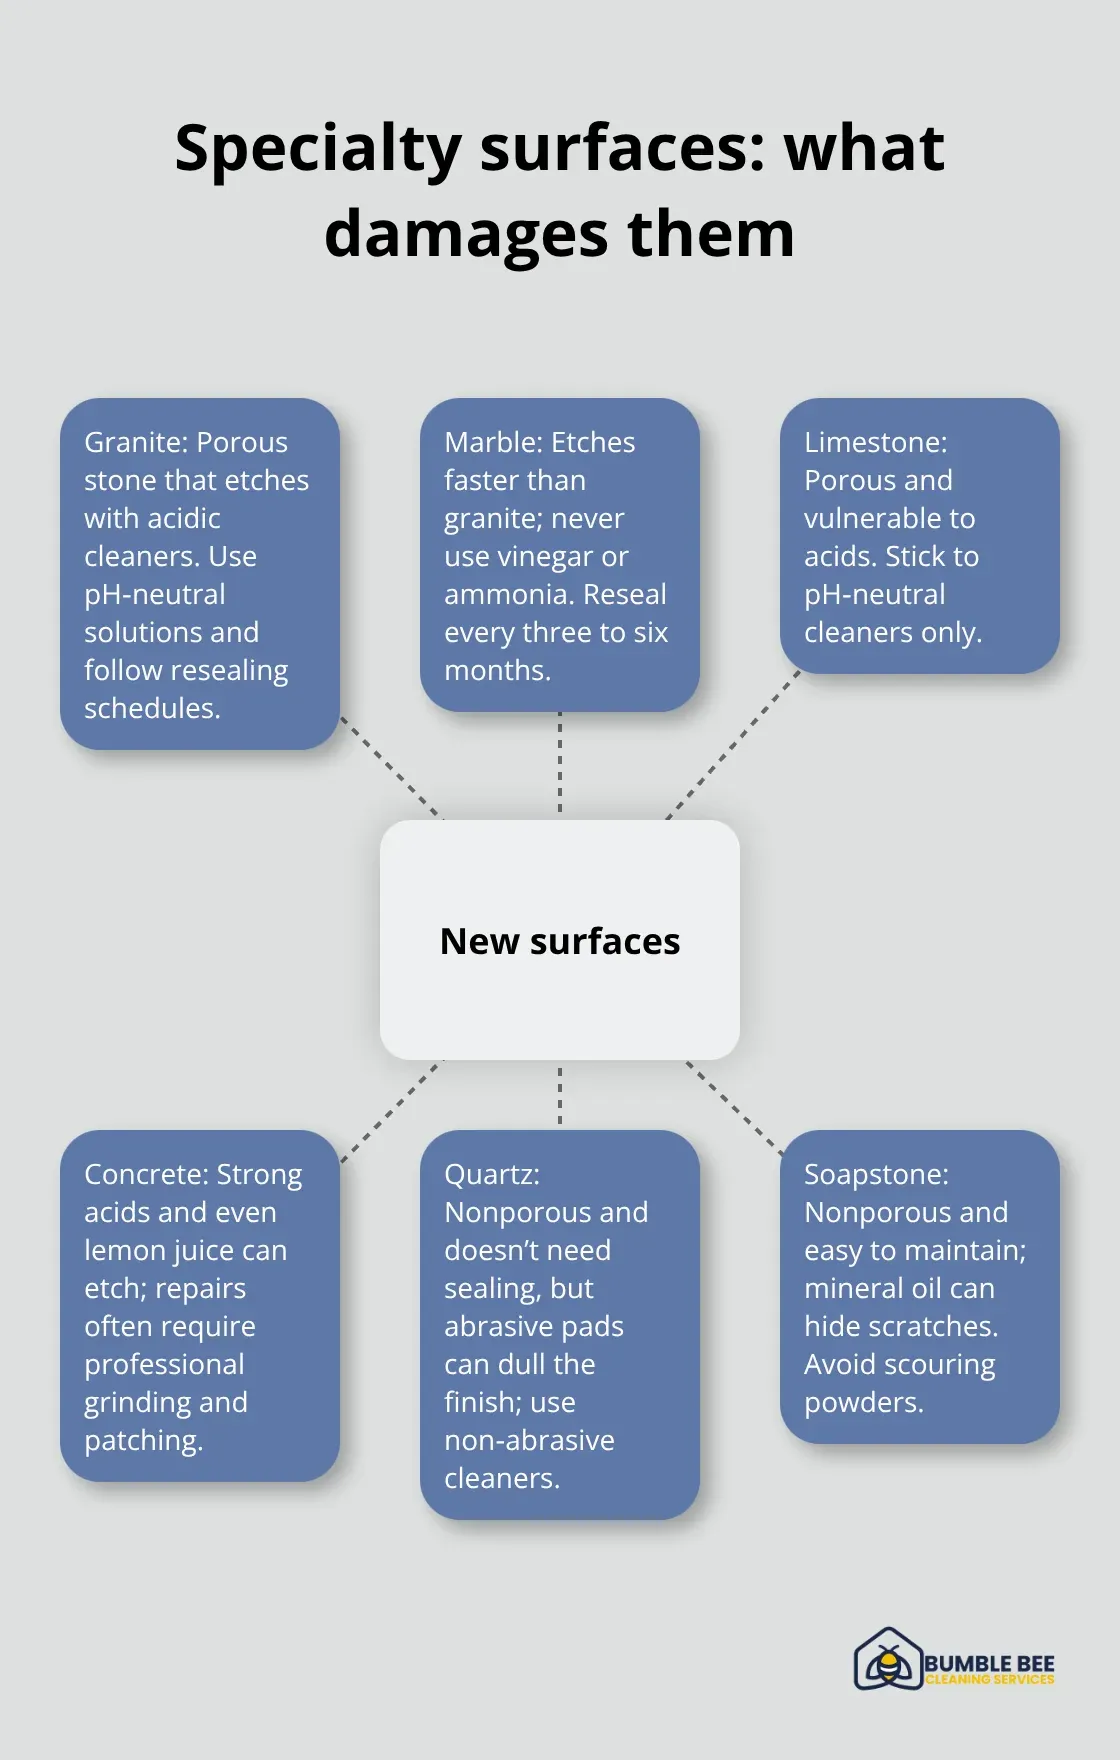
Your newly renovated Seattle home contains surfaces that didn’t exist before, and they require different cleaning approaches than standard housekeeping. Hardwood floors installed during renovation have fresh finishes that are vulnerable to moisture and harsh chemicals for the first few months. New stone countertops-whether granite, marble, limestone, concrete, or quartz-each have distinct vulnerabilities. Granite and limestone are porous and etch from acidic cleaners, while marble etches even faster and requires resealing to prevent staining. Concrete countertops etch from strong acids like lemon juice, and etching damage typically requires professional grinding and patching to restore.
Quartz and Soapstone Surfaces
Quartz is nonporous and doesn’t require sealing, making it more forgiving, but it still dulls from abrasive scrubbing pads. Soapstone is nonporous and easy to maintain, though mineral oil rubbing hides scratches and darkens the surface over time. These engineered and natural stones tolerate different cleaning methods, so identifying which stone you have prevents damage before it happens.
Tile, Grout, and Glass
Newly installed tile and grout lines trap fine drywall and plaster dust that ordinary vacuums miss, while fresh grout remains porous for weeks and absorbs stains easily. Glass and mirrors installed during renovation often have adhesive residue or protective coatings that require specific removal techniques to avoid streaking or coating damage. Each surface type demands its own approach.
The Critical Timing Factor
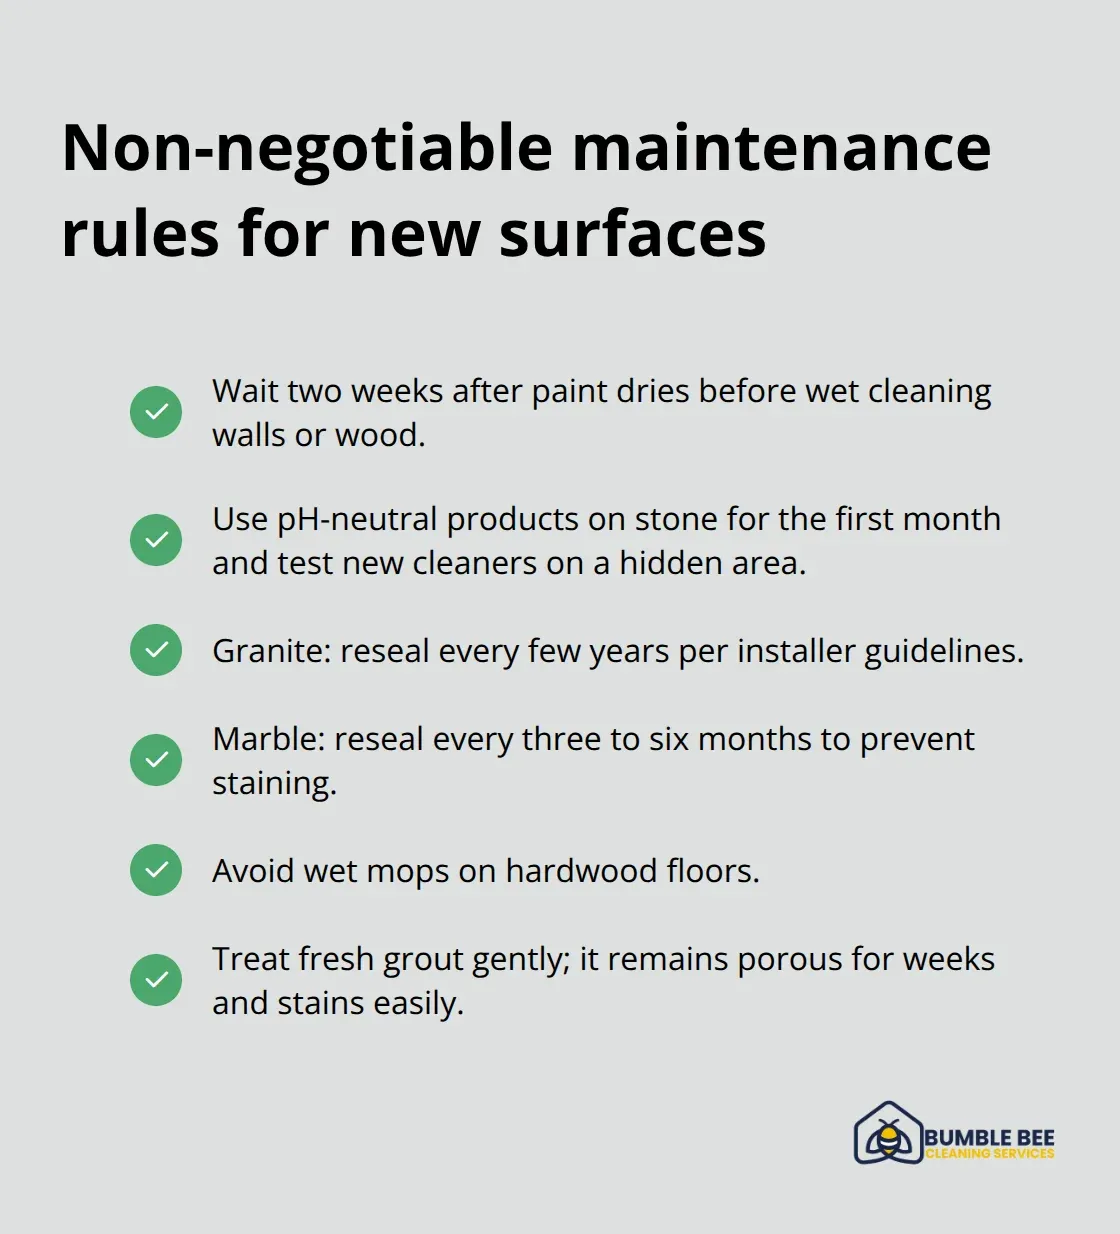
Most contractors recommend waiting two weeks after paint dries before using wet cleaning methods on walls and wood surfaces, since fresh finishes need time to cure fully. For specialty surfaces, this means your first post-renovation clean should focus on dry dusting with HEPA-filter vacuums and microfiber cloths before introducing any moisture. This prevents fine dust from turning into sludge and protects sensitive finishes. Start by walking through each room and noting which surfaces you’ve installed, then match each surface to its specific cleaning requirements before you touch anything with water or cleaner. This assessment prevents costly mistakes that can permanently damage finishes worth thousands of dollars.
The surfaces in your home now demand precision. Understanding what you’re cleaning sets the stage for choosing the right methods-and avoiding the mistakes that cause permanent damage.
The Right Approach to Post-Renovation Surfaces
Start with Dry Dusting
Dry dusting comes first, and it’s non-negotiable. Fine drywall and plaster dust cling to every surface after renovation, and introducing moisture before vacuuming turns that dust into stubborn sludge that scratches finishes. Start with a HEPA-filter vacuum designed to capture microscopic particles that standard vacuums leave behind. Construction dust can contain silica and other hazardous substances according to OSHA guidelines. After vacuuming, use microfiber cloths for dry wiping-they trap dust without scratching paint or stone. Work from the ceiling down to baseboards so gravity doesn’t recontaminate cleaned areas. For edges and corners where dust hides, a soft-bristled brush reaches places cloths miss.
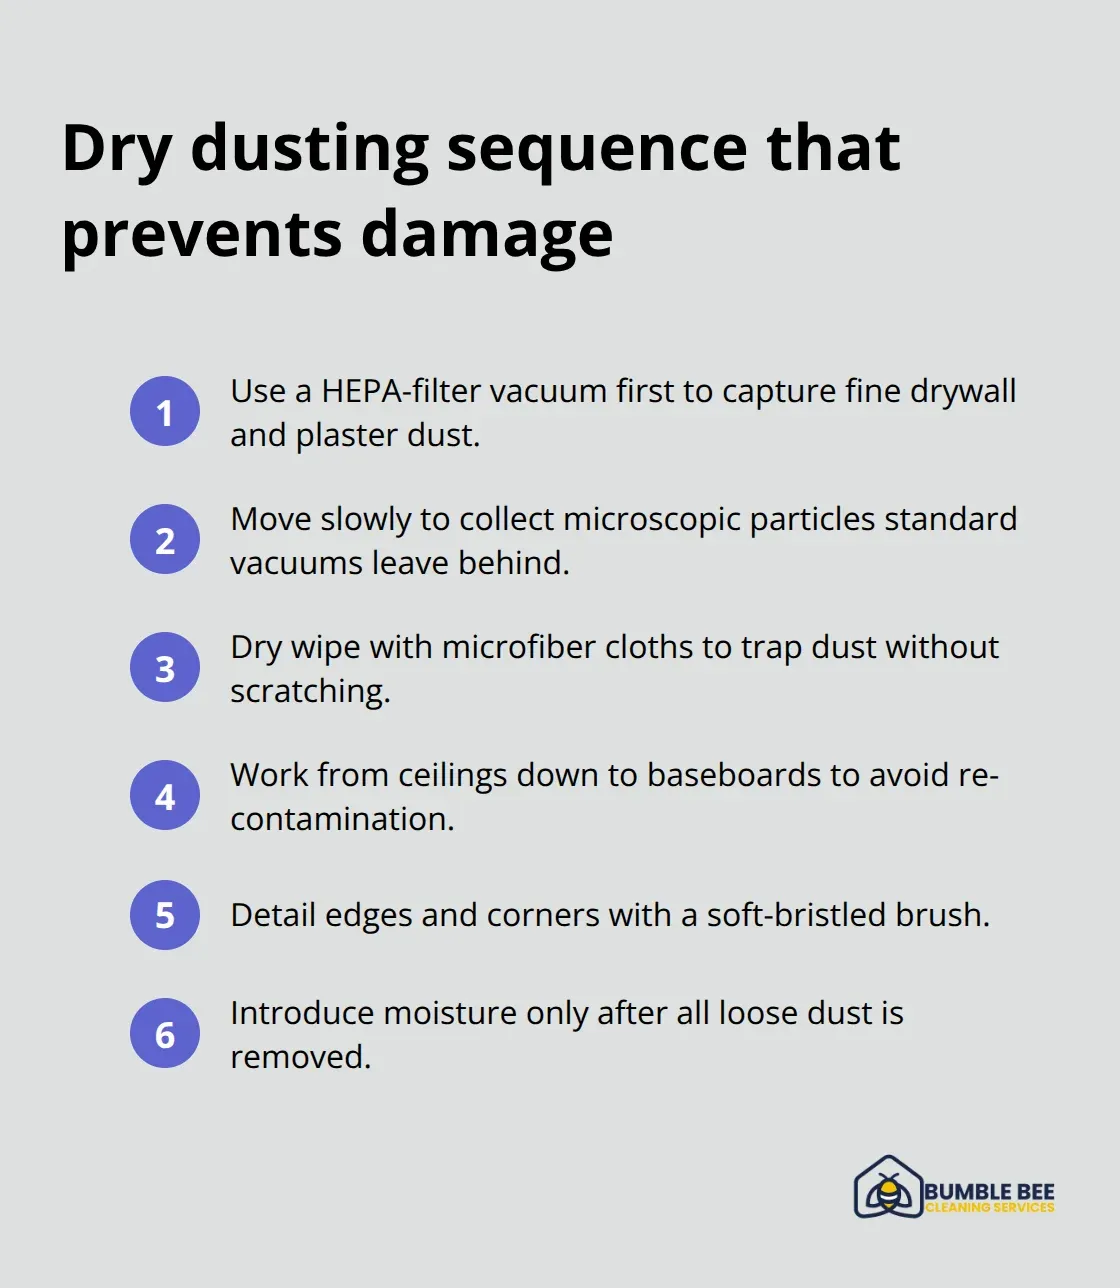
Only after you’ve removed all loose dust should you consider moisture-based cleaning.
pH-Neutral Cleaners Protect Specialty Surfaces
When you introduce water and cleaners, pH-neutral products protect specialty surfaces far better than all-purpose cleaners. Acidic cleaners etch granite and limestone instantly, while alkaline products can dull stone finishes. For granite, mix one teaspoon of dish detergent with four cups of water, apply with a microfiber cloth, and let the surface air dry to maintain shine. Marble requires the same mild approach since it etches faster than granite-wipe spills immediately and never use vinegar or ammonia. Concrete countertops also etch from strong acids like lemon juice, so stick to neutral dish soap solutions. For quartz countertops, glass cleaners or other non-abrasive cleaners work fine since quartz doesn’t require sealing. Soapstone cleans easily with ordinary household cleaner and water, though avoid scouring powders entirely.
Treating Stains and Maintaining Seals
For stubborn stains on stone surfaces, a paste of baking soda and hydrogen peroxide applied for 24 hours under plastic wrap removes marks without etching. After using any paste treatment, reseal the area according to your installer’s guidelines-granite needs resealing every few years, and marble every three to six months to prevent staining. Hardwood floors demand the same caution: use only pH-neutral wood cleaners, never wet mops, and wait the full two weeks after paint drying before any wet cleaning.
Grout, Glass, and Final Precautions
Newly installed tile and grout require special attention since fresh grout remains porous for weeks and absorbs stains permanently. For grout lines, a soft brush with mild detergent removes dust without damaging the grout seal. Glass and mirrors installed during renovation often have protective coatings or adhesive residue that glass cleaner alone won’t remove safely, so test any new product on a hidden corner first before applying it to visible surfaces. These precautions protect your investment, but they also reveal why mistakes happen so easily-one wrong product or technique can undo months of renovation work in seconds.
What Damages New Surfaces Most After Renovation
Harsh Chemicals Etch Stone and Finishes Instantly
The mistakes happen in the first two weeks after your renovation finishes, when your home is most vulnerable. Most homeowners reach for whatever cleaner sits under their sink, and that single decision can permanently damage stone countertops, hardwood floors, or grout that cost thousands to install. Ammonia-based cleaners, vinegar solutions, and harsh degreasers work fine on old surfaces but etch granite, marble, and limestone instantly. Acidic products like vinegar or lemon-based cleaners eat into concrete countertops in minutes, creating pits and discoloration that professional grinding and patching cannot always restore completely.
Even dish soap that works perfectly on everyday dishes can leave streaks on fresh stone if the water temperature is too hot or the cloth is too wet. The problem is that damage appears immediately on some surfaces but takes weeks to show on others, so homeowners don’t connect the cleaner they used yesterday to the etching they notice today. Stone surfaces demand pH-neutral products exclusively for the first month after installation, and that means testing any new cleaner on a hidden area first.
Your contractor should have provided care instructions for each surface type. Follow those guidelines precisely rather than assuming all-purpose cleaners are safe.
Excess Moisture Warps Wood and Traps Water Under Seals
Water causes equal damage through different mechanisms. Excess moisture on fresh hardwood floors causes the wood to swell and warp, while wet cleaning on newly sealed stone surfaces traps water beneath the seal and creates permanent dark spots that won’t fade. Fresh grout lines absorb water like a sponge during the first four weeks after installation, and that absorbed moisture can cause efflorescence-a white mineral deposit that stains grout permanently.
Concrete countertops absorb water too, and prolonged moisture exposure leads to mold growth inside the porous surface where you cannot reach it. Neglecting to reseal stone after cleaning compounds these problems because water penetrates unprotected surfaces far more easily.
Skipping Resealing Leaves Surfaces Vulnerable
Granite requires resealing every few years according to your installer’s guidelines, and marble needs resealing every three to six months to prevent water damage and staining. Many homeowners skip resealing entirely because the need is not obvious until dark stains appear, but the damage is done once stains set in. Have your installer demonstrate the correct resealing process and schedule it on your calendar immediately after the first post-renovation clean finishes, treating it as non-negotiable maintenance rather than optional upkeep.
Final Thoughts
DIY post-renovation cleaning works for small touch-ups, but specialty surface cleaning after a full renovation demands expertise most homeowners lack. One wrong product or technique damages finishes worth thousands, and by the time you notice the damage, it’s permanent. We at Bumble Bee Cleaning Services have spent a decade handling post-construction cleaning across Seattle homes, and we’ve seen every mistake happen once.
Professional cleaners bring specialized equipment that matters-a HEPA-filter vacuum costs around $500, and industrial-grade equipment runs higher. We own this equipment and know exactly how to use it on each surface type without causing damage. More importantly, we understand the timing: waiting the full two weeks after paint dries, dry dusting before any moisture touches surfaces, and resealing stone immediately after cleaning.
What you get from a thorough post-renovation clean is a move-in ready home with no hidden dust in air vents, no streaks on glass, no etching on stone, and no water damage under seals. Bumble Bee Cleaning Services handles post-construction cleaning with certified technicians who understand specialty surfaces and follow industry standards. Your Seattle home deserves professionals who know exactly what they’re doing.
For more information about our cleaning services in Seattle and Atlanta, or to request a cleaning quote, call or text us at 425-786-1360 or email us at info@qbclean.com