Moving out of your Seattle rental means facing a move-out inspection that can make or break your deposit return. Landlords scrutinize furniture condition closely, and worn upholstery, scratches, and stains often trigger deductions.
We at Bumble Bee Cleaning Services know that restoring your furniture before inspection day is smarter than losing money. This guide walks you through assessing damage, tackling repairs yourself, and knowing when to call professionals.
Assessment and Planning for Your Seattle Move-Out
Photograph Your Furniture Now, Not Later
Start your furniture assessment immediately, not two weeks before moving day. The National Association of Professional Organizers found that structured planning eight weeks ahead increases on-schedule completion by 70 percent, and furniture restoration often becomes the slowest part of that timeline.

Walk through each room with your phone camera and photograph every piece from multiple angles, capturing scratches, stains, fading, and worn upholstery. This documentation protects you against deposit disputes and gives you a clear baseline for what needs work. Mark problem areas directly on photos so you have a visual reference as you plan repairs.
Focus on High-Impact Pieces First
Not every scratch deserves your attention. Landlords notice high-visibility pieces first: sofas, dining tables, bedroom sets, and any furniture in main living areas. A small nick on the underside of a dresser won’t cost you money, but a visible stain on your sofa will. Assess each piece honestly: can you fix it yourself in an afternoon, or does it need professional help? A wood scratch on a coffee table might take 30 minutes with touch-up markers and wood filler, while deep gouges on a hardwood dresser demand professional refinishing. The American Cleaning Institute reports that move-out cleaning alone consumes double the weekly time most people spend on cleaning, so adding furniture restoration without prioritization will overwhelm your schedule. List your pieces by impact level: high-visibility items that affect the overall impression, mid-level pieces that show wear but aren’t showstoppers, and low-priority items that are less noticeable. This ranking keeps you focused on what actually influences your deposit return.
Create a Realistic Timeline
Eight weeks is your ideal window, but six weeks is the practical minimum if you’re hiring professionals. Seattle’s move-out cleaning is in high demand, and professional restoration services typically require three weeks’ notice during off-season and six to eight weeks during peak season (especially summer months). If you handle DIY repairs, start eight weeks out so you have time to tackle mistakes and let finishes cure properly. Refinished wood needs time between coats, and rushing this step ruins the final look. Schedule professional services like upholstery cleaning or leather repair as your first priority, since those specialists book fastest. Handle your own touch-ups and minor repairs in the middle weeks, then save the final two weeks for a complete walkthrough and any last-minute fixes before your inspection. Build in buffer time for unexpected damage you discover during cleaning or for products that don’t match your furniture’s color as well as you hoped.
With your assessment complete and timeline in place, you’re ready to move into the actual restoration work-starting with the cleaning and repair techniques that tackle the most common damage landlords spot during inspections.
Cleaning and Restoration Techniques
Deep cleaning your furniture before inspection is non-negotiable. Most landlords expect surfaces free of dust, grime, and stains, and a quick vacuum won’t cut it. For upholstery, start with a stiff brush to loosen embedded dirt, then use a handheld extractor or rent one from a hardware store for roughly $30–50 per day.
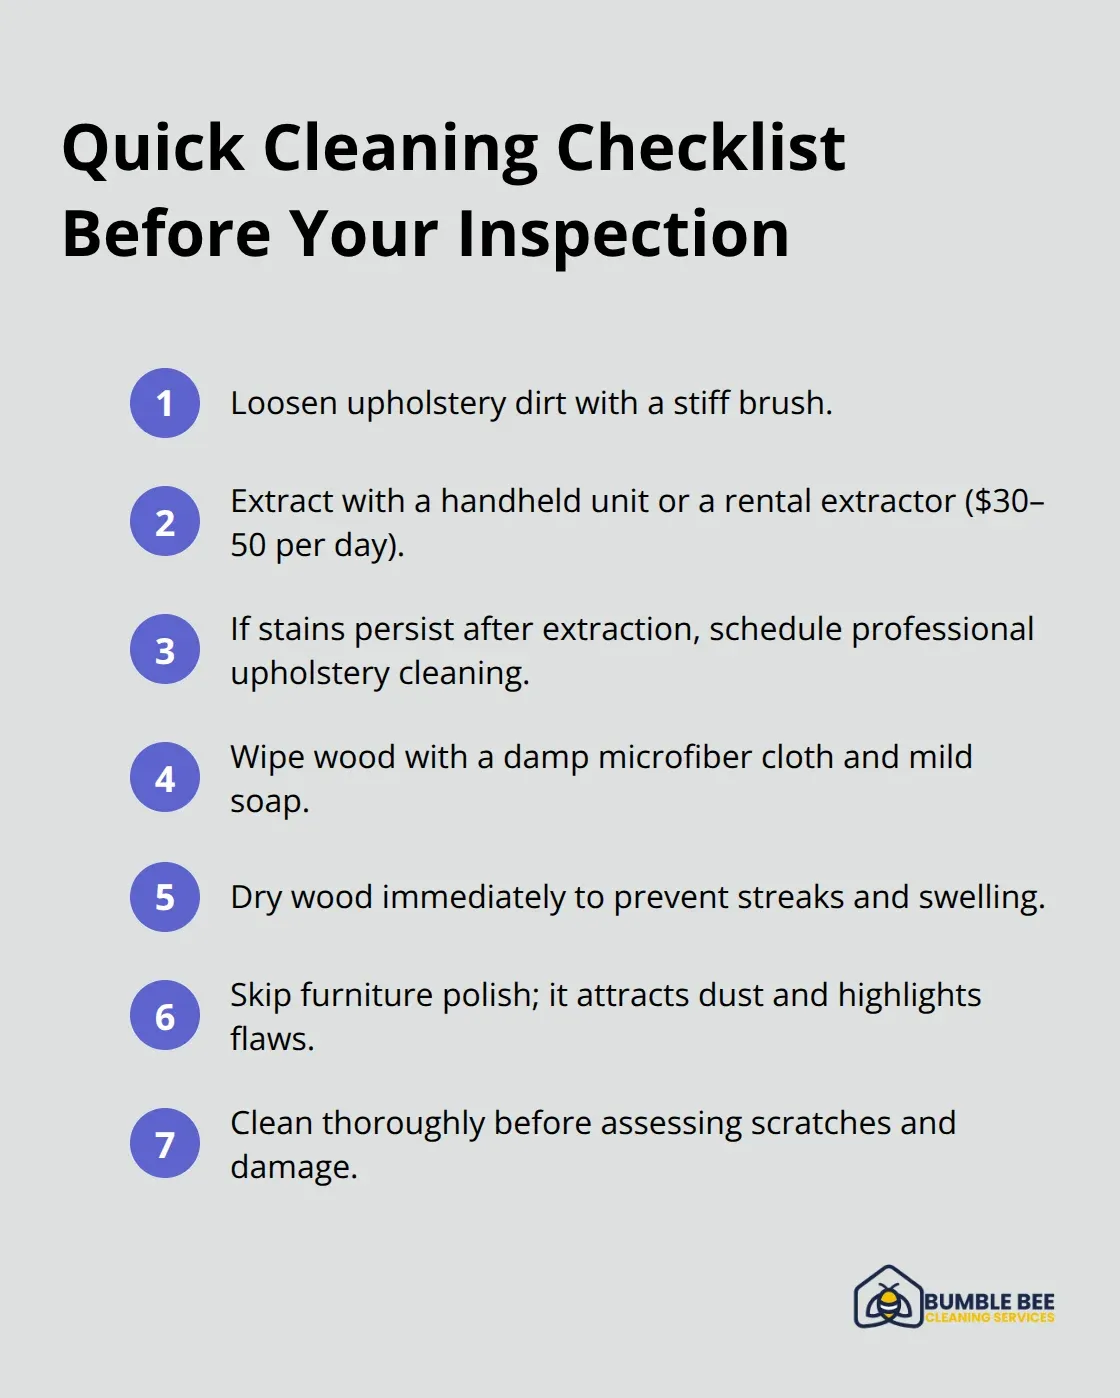
Professional cleaners spend substantial time on upholstery alone because fabric traps oils and dirt that surface cleaning misses. If stains persist after extraction, professional upholstery cleaning becomes your best option. Services like Eidem Upholstery in Seattle can handle stubborn stains and refresh faded fabrics without the risk of over-wetting or shrinkage that DIY methods introduce. For wood furniture, skip the furniture polish and use a damp microfiber cloth with mild soap and water, then dry immediately. Polish attracts dust and can leave streaks that make damage more visible. Clean wood thoroughly before assessing scratches and damage, because what looks like a deep gouge might just be grime.
Address Scratches and Minor Damage
Wood scratches fall into two categories: surface-level marks and gouges that penetrate the finish. Surface scratches on stained wood respond well to touch-up markers that match your furniture’s color-test on an inconspicuous area first because color matching is harder than it sounds. For deeper scratches, use color-matched wood filler to fill the gap, let it cure fully, then sand flush with 220-grit sandpaper and apply stain if needed. Gouges wider than a pencil or deeper than you can hide with your fingernail require professional refinishing, and attempting this yourself often makes damage worse. For veneer surfaces, never sand aggressively because you risk sanding through the thin veneer layer to the substrate below. Instead, use chemical finish removers on small areas, then apply matching stain and topcoat. Veneer damage-peeling edges or bubbles-demands professional attention; attempting to reglue veneer without proper clamps and pressure usually fails. On upholstered pieces, small tears in fabric yield to invisible patches if you source matching fabric, but large rips or multiple damaged areas warrant professional reupholstering. Leather furniture showing cracks, fading, or sagging cushions should go to specialists like Eidem Upholstery because leather repair requires color matching and conditioning that home treatments cannot replicate.
Refinish and Paint Touch-Ups
Refinishing entire pieces takes time and skill, but targeted touch-ups are manageable if you follow a disciplined process. Start with a finish test on a hidden area to identify whether your furniture has oil-based or water-based coating, because using the wrong solvent or topcoat will create blotchy, uneven results. Clean the surface thoroughly with a damp cloth to remove dust and oils, then allow it to dry completely. Sand the problem area lightly with 150–220 grit sandpaper, working with the grain on wood, then wipe away all dust with a tack cloth before applying stain or paint. Apply thin coats rather than one thick coat; thick applications dry unevenly and look worse than the original damage. For painted furniture, match the existing paint type and color by bringing a chip or photo to a paint retailer. Sand the chipped area, apply primer if bare wood is exposed, then paint with a foam brush for a smoother finish than bristles provide. Between coats, sand lightly with 320-grit paper and remove dust completely. Allow full curing time before moving the piece; paint needs 24–48 hours to harden properly, and rushing this step invites damage during transport. For stained wood, apply a pre-stain conditioner on soft woods like pine to prevent blotchy absorption, then apply stain in thin, even coats and wipe excess according to product directions. Seal with polyurethane or water-based topcoat depending on your priorities-polyurethane is more durable but has stronger odor and longer curing time. Sand between coats and apply two to three thin layers rather than one heavy coat for a professional appearance that withstands landlord scrutiny.
Know When Professional Help Matters Most
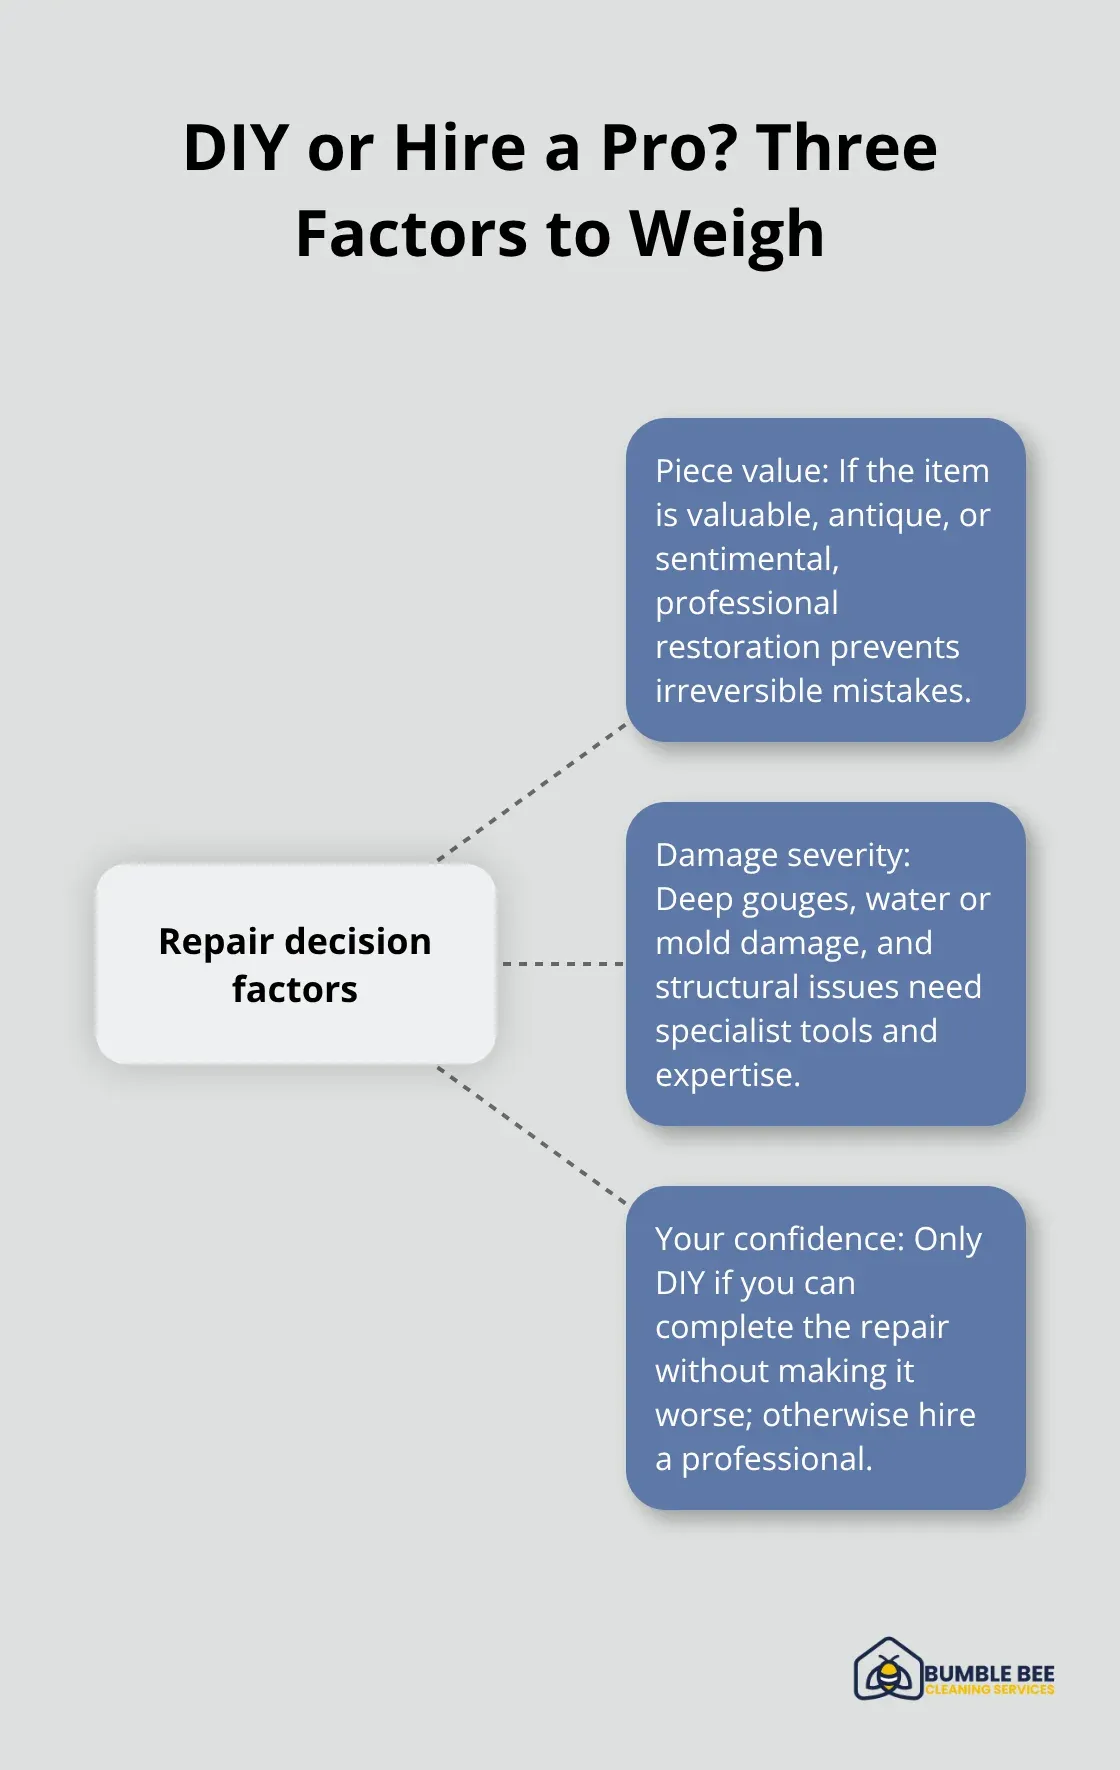
Some damage exceeds DIY capability, and recognizing this boundary saves you money and frustration. Valuable or antique pieces deserve professional restoration because mistakes on heirlooms are irreversible. Deep gouges, water damage, mold, or structural issues with frames and joints require specialists who have the tools and expertise to restore properly. Get quotes from at least two furniture restoration services in Seattle before committing; prices vary widely based on the piece’s complexity and materials. Professional services cost more upfront but protect your deposit and preserve furniture you plan to keep. The decision between DIY and professional work hinges on three factors: the piece’s value to you, the damage severity, and your confidence in executing the repair without making it worse. When in doubt, consult a professional first-many offer free assessments that help you decide whether to proceed with repairs or accept minor deductions.
With your furniture cleaned and repairs complete, the next step involves knowing which specialists to hire and how to balance cost against quality for the repairs that matter most to your move-out success.
Professional Help and When to Seek It
Recognize When DIY Repairs Fail
Valuable pieces, antiques, and items with sentimental worth should never become DIY projects because one wrong move-over-sanding veneer, using the wrong solvent, or applying incompatible stain-destroys the piece permanently. Rob Beals of Lazarus Furniture and Antique Refinishing in Seattle has spent 28 years restoring everything from 1930s baby high chairs to midcentury heirlooms, and his work shows that professional restoration preserves both the furniture’s integrity and its value. If a piece belonged to your grandmother or cost more than $500 originally, professional restoration protects your investment. Water damage, mold, structural frame issues, and deep gouges that penetrate past the finish line also demand specialists. Attempting to reglue a loose joint without proper clamps fails, and DIY water damage repair frequently misses hidden moisture that causes mold months later.
Know Your Limits on Leather and Upholstery
Leather furniture showing cracks, sagging cushions, or faded color requires specialists like Eidem Upholstery because leather conditioning and color matching involve chemistry and experience that store-bought products cannot replicate. Upholstery with stubborn stains, odors, or extensive wear also belongs with professionals-extraction equipment in rental stores cannot match commercial-grade machines, and over-wetting fabric causes shrinkage and mildew that landlords will deduct from your deposit. The IICRC S320 Standard outlines a professional assessment process that helps determine whether a piece needs simple cleaning, repair, or replacement, giving you a framework to decide when professional help is worth the cost.
Get Multiple Quotes and Compare
Contact at least two restoration services before committing, because pricing varies dramatically based on materials, complexity, and the specialist’s experience level. Lazarus Furniture, Eidem Upholstery, and Rescue Vintage are established Seattle shops with track records on move-out projects, and contacting multiple services gives you realistic pricing and helps identify which specialists match your timeline and budget. Ask each quote whether they offer guarantees or reclean services if results fall short-professionals confident in their work stand behind it. For minor repairs you handle yourself, the real cost is time and the risk of making damage worse; if a scratch takes you four hours of research, testing, and application, professional touch-up costs $75–150 and delivers better results.
Calculate the True Cost of DIY
The threshold is simple: if the repair takes you more than two hours or involves techniques you have never attempted, hire a professional. Move-out inspections happen once, and landlords judge your entire deposit return on that single visit, so cutting corners on high-visibility pieces guarantees regret when deductions appear on your final accounting. A professional service protects your deposit far more effectively than a rushed DIY attempt that looks unfinished or creates new damage. Specialists complete work faster, deliver consistent results, and often provide written guarantees that protect you if the landlord disputes the quality of repairs.
Final Thoughts
Restoring your furniture before a Seattle move-out inspection protects your deposit and demonstrates respect for the rental property. Surface-level repairs like touch-up markers and wood filler handle minor damage, while deeper issues like water damage, structural problems, and stubborn upholstery cleaning demand specialist attention. The difference between a rushed DIY attempt and professional work often determines whether you recover your full deposit or face unexpected deductions.
Your move-out inspection happens once, and landlords scrutinize furniture condition as part of their overall assessment of the rental’s return state. A sofa with stubborn stains might cost you $200–400 in deposit deductions, while professional upholstery cleaning runs $150–300 and protects your money. Starting eight weeks before your move date gives you time to handle repairs without panic, schedule professionals during their less-busy periods, and complete work with proper curing time between coats and treatments.
We at Bumble Bee Cleaning Services understand that move-out preparation extends beyond furniture restoration to include deep cleaning of floors, walls, and fixtures that landlords inspect alongside your furniture. Contact us for a move-out cleaning assessment that covers both furniture preparation and the complete property cleaning your inspection requires. Start your furniture restoration plan this week, and approach your move-out with confidence that your deposit return is protected.
For more information about our cleaning services in Seattle and Atlanta, or to request a cleaning quote, call or text us at 425-786-1360 or email us at info@qbclean.com