Construction projects can turn your beautiful Seattle carpets into expensive casualties. Dust, debris, and heavy foot traffic create permanent damage that costs thousands to repair or replace.
We at Bumble Bee Cleaning Services see homeowners make the same costly mistakes repeatedly. Proper carpet protection saves you money and preserves your flooring investment throughout any renovation project.
What Should You Do Before Construction Starts?
Start With Professional Assessment
Your carpet’s fiber type determines everything about protection strategy. Wool carpets need different treatment than synthetic ones, and plush carpets collect debris differently than berber styles. Walk through your space with your contractor and identify high-traffic zones, storage areas for materials, and potential spill locations. Document your carpet’s current condition with photos before any work begins.
Choose Materials Based on Project Duration
Construction timeline dictates your protection choices. Projects under two weeks work well with heavy-duty plastic sheeting, but longer renovations need breathable materials to prevent moisture buildup and mold growth. Trimaco’s Easy Mask Protective Carpet Film handles up to 30 days of coverage without leaving residue, while basic plastic fails after one week. Never use standard painter’s plastic for more than five days. Proper covering materials help maintain indoor air quality during construction.
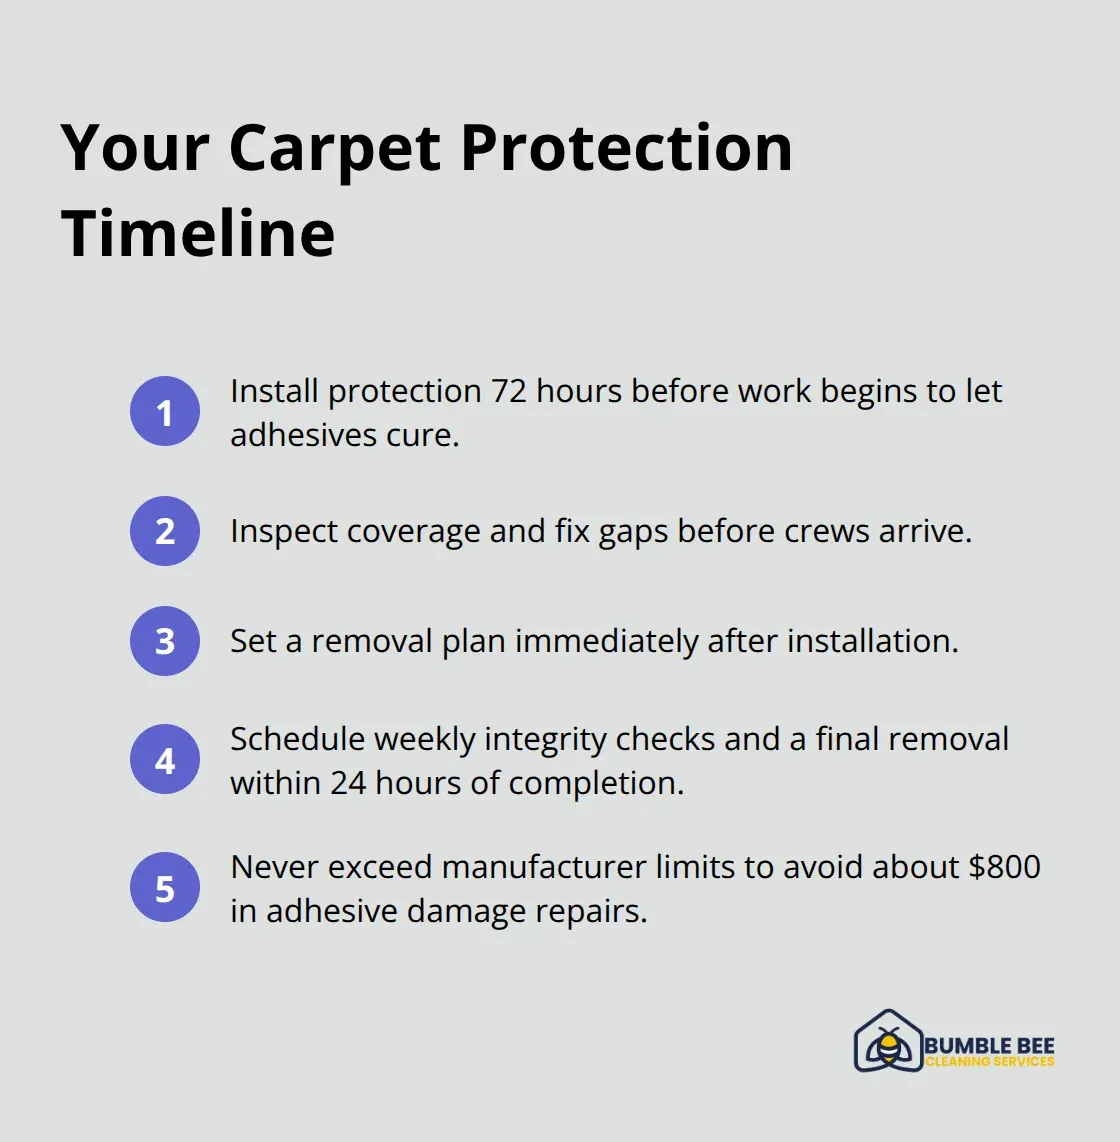
Set Up Protection Timeline
Install protection 72 hours before construction begins, not the morning workers arrive. This timing allows adhesives to set properly and gives you time to fix any coverage gaps. Create your removal schedule immediately after installation. Mark calendar dates for checking protection integrity weekly and final removal within 24 hours of project completion (leaving materials down beyond manufacturer recommendations costs homeowners an average of $800 in adhesive damage repairs).
Prepare Your Space
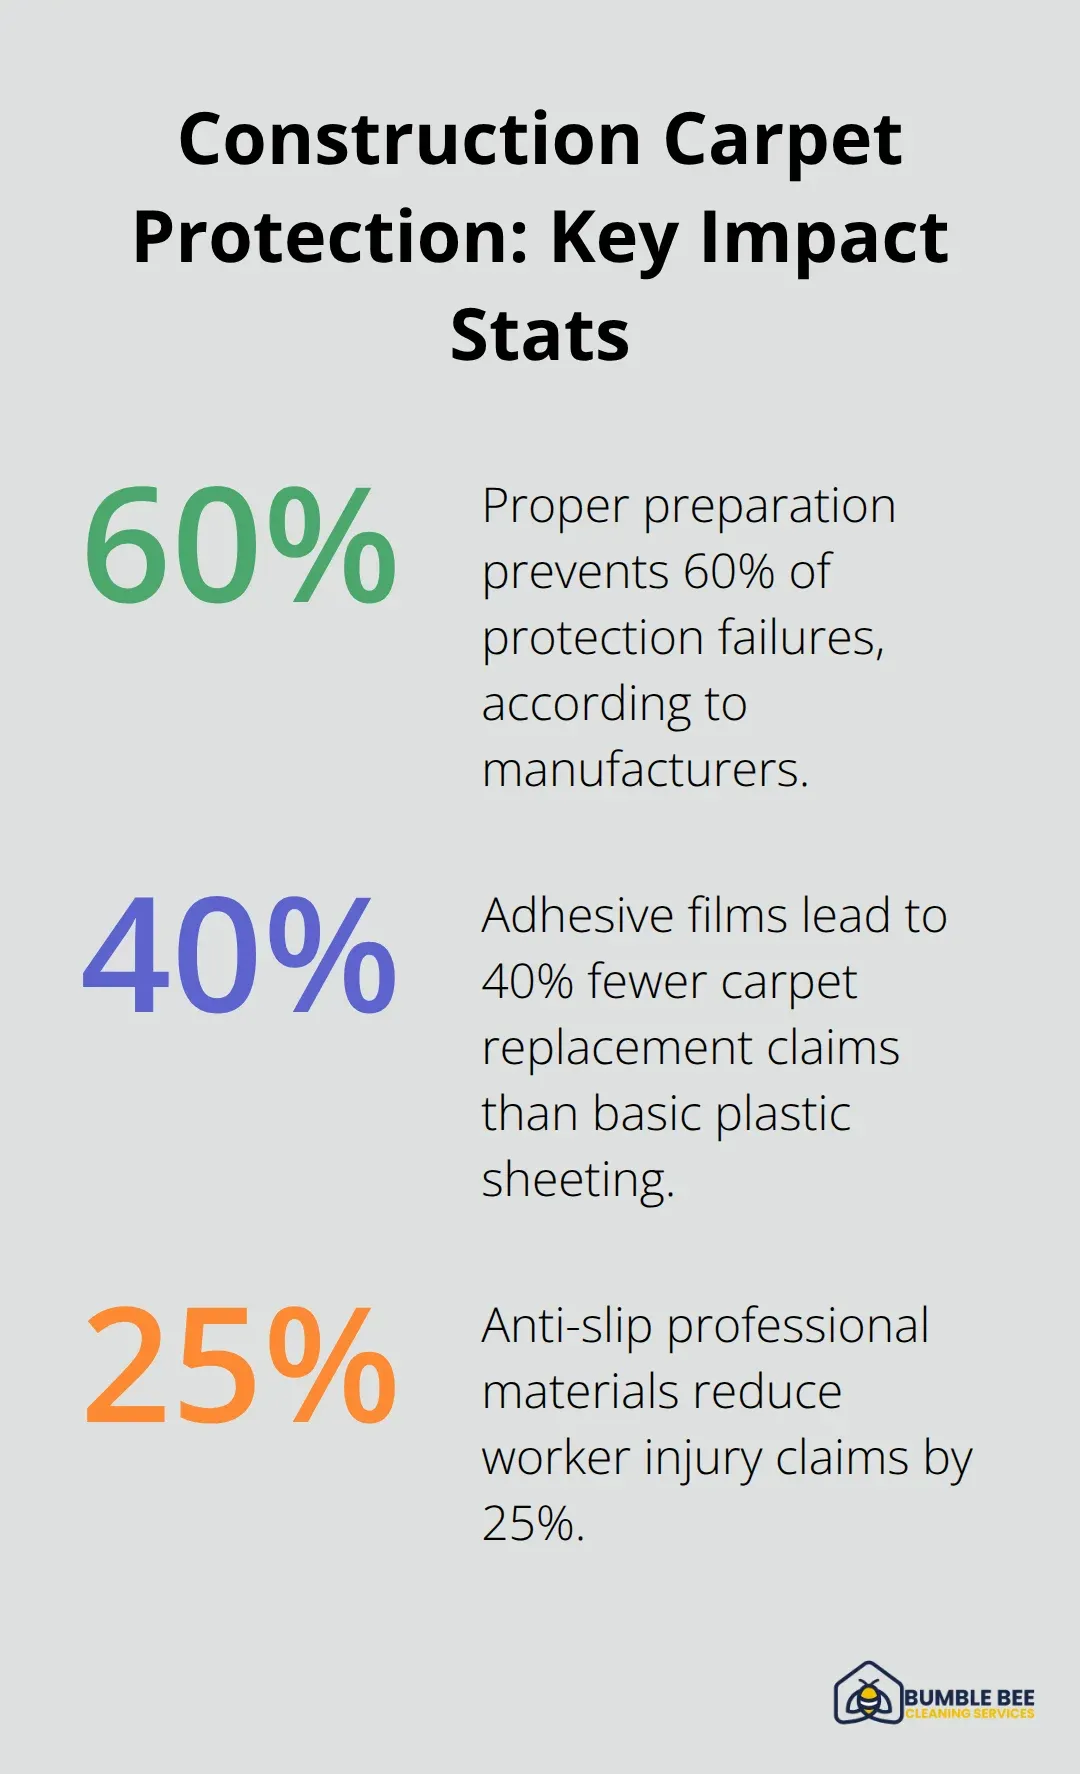
Clear furniture and personal items from work areas before you apply protective materials. Vacuum carpets thoroughly to remove existing dirt and debris that could interfere with adhesive bonds. Test any protective film in an inconspicuous area first to check compatibility with your specific carpet type. This preparation step prevents 60% of protection failures according to surface protection manufacturers.
With your assessment complete and materials selected, you need to understand which specific protection methods work best for different construction scenarios. Planning ahead also helps you prepare for the post-construction cleaning process that follows your renovation project.
Which Materials Actually Work
Heavy-duty plastic sheeting remains the most cost-effective option for short construction projects that last under ten days. Standard 6-mil polyethylene provides adequate protection from debris and moisture, while 4-mil thickness tears easily under construction boots. Adhesive films like Trimaco’s Easy Mask offer superior performance for extended projects and maintain bond strength for 30 days without residue damage. Professional contractors report 40% fewer carpet replacement claims when they use adhesive films versus basic plastic sheeting.
Breathable Papers Save Money Long-Term
Construction-grade kraft paper prevents moisture buildup that destroys carpet backing during humid Seattle weather. Paper barriers cost 60% more upfront but prevent the mold damage that plastic sheeting causes in projects that exceed two weeks. Cardboard provides excellent puncture resistance for areas with heavy tool storage, though it requires replacement every seven days in high-traffic zones. The National Institute for Occupational Safety and Health recommends breathable materials for projects that generate significant moisture from concrete curing or paint drying.
Professional Masks Handle Heavy Traffic
Carpet protection films designed for construction withstand 500 pounds per square inch without tearing (compared to 150 pounds for household plastic). Temporary flooring systems like plywood subflooring distribute weight evenly and prevent carpet compression from equipment storage. These systems cost $3 per square foot installed but eliminate carpet replacement expenses that average $12 per square foot in Seattle markets. Professional-grade materials include anti-slip surfaces that reduce worker injury claims by 25% according to OSHA construction safety data.
Installation Methods Matter
Apply protective materials in overlapping strips to prevent gaps where debris can penetrate. Start installation from the furthest corner and work toward exit points to avoid walking on freshly applied materials. Use appropriate tape designed for your specific carpet type (standard masking tape damages delicate fibers while construction-grade tape holds securely without residue). Test adhesion strength in small sections before full application to prevent costly removal problems later.
Your material selection sets the foundation for protection success, but proper traffic management determines whether your carpets survive the construction chaos that follows.
How Do You Control Construction Chaos
Create Physical Boundaries That Work
Establish a single entry point for all construction personnel and mark it with bright tape or signage. Construction workers generate significant debris during daily activities, so multiple entry points multiply your cleanup costs exponentially. Install heavy-duty mats at this designated entrance and replace them every three days during active construction phases. Position material storage zones at least six feet away from protected carpet areas to prevent accidental spills and tool drops that puncture protective barriers. Rope off or barricade protected carpet zones completely to eliminate accidental foot traffic from subcontractors who arrive without briefings.
Implement Daily Maintenance Protocols
Vacuum all protective materials daily with HEPA-filtered equipment that captures particles as small as 0.3 microns. Standard shop vacuums have limitations in capturing construction dust, which allows particles to penetrate protective barriers through microscopic gaps. Check barrier edges and seams twice daily for damage or loose sections, especially around doorways where foot traffic concentrates. Replace damaged sections immediately rather than apply tape patches that fail within 24 hours.
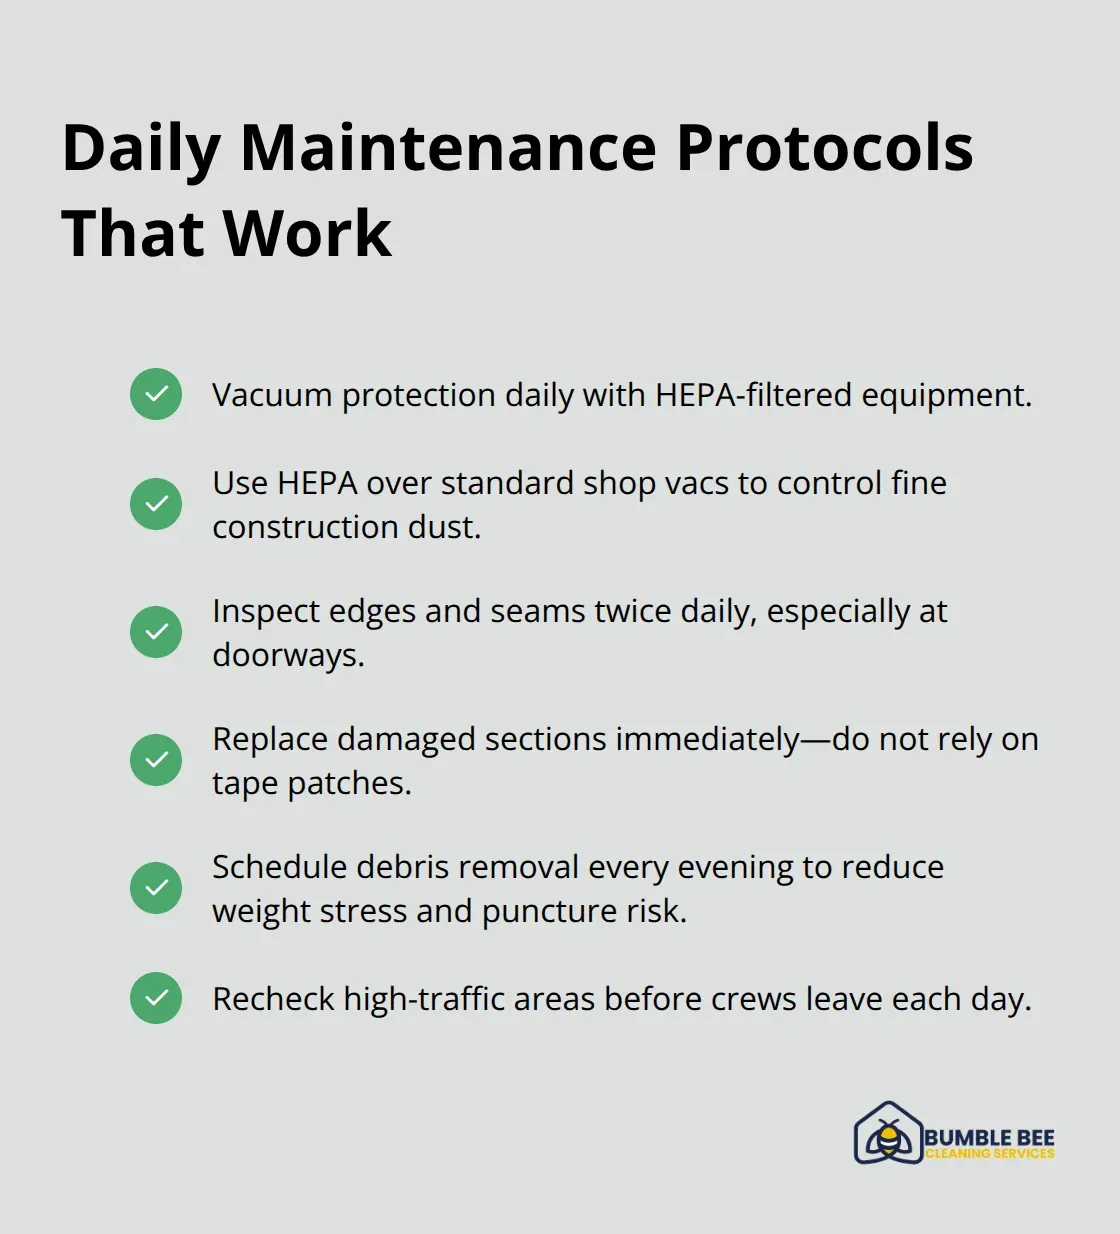
Schedule debris removal every evening to prevent accumulation that adds weight stress to protective materials and increases puncture risk.
Monitor Protection Performance Weekly
Inspect adhesive bond strength weekly by lifting corner sections gently to test for residue buildup or premature release. Protection films that release early indicate moisture problems or incompatible carpet fibers that require immediate material changes. Measure debris accumulation depth on protective surfaces with a ruler to track project cleanliness standards. Debris layers that exceed one-quarter inch indicate inadequate daily maintenance that compromises protection effectiveness. Replace breathable paper barriers every seven days regardless of appearance since moisture saturation reduces puncture resistance by 60% even when materials look intact.
Address Seattle Climate Challenges
Temperature fluctuations in Seattle’s climate cause expansion and contraction that weakens adhesive bonds after 14 days. This makes replacement schedules non-negotiable for project success. Document protection condition with daily photos to track deterioration patterns and identify problem areas before failures occur. High humidity levels (common in Seattle construction projects) accelerate adhesive breakdown and require more frequent barrier inspections than drier climates demand. Professional-grade dehumidifiers become essential when moisture levels exceed normal ranges, and post-construction cleaning challenges require specialized approaches to address accumulated debris effectively.
Final Thoughts
Carpet protection during construction demands three fundamental steps: thorough pre-planning with proper material selection, consistent daily maintenance throughout the project, and professional post-construction cleanup. Seattle homeowners who follow these protocols save an average of $2,400 in carpet replacement costs per renovation project. The long-term benefits extend beyond immediate cost savings.
Proper planning prevents indoor air quality issues that affect your family’s health for months after construction ends. Protected carpets maintain their warranty coverage, while damaged carpets void manufacturer guarantees completely. Professional cleaning becomes essential when construction dust penetrates protective barriers or when projects exceed 30 days (especially in Seattle’s humid climate).
We at Bumble Bee Cleaning Services specialize in post-construction cleaning with HEPA-filtered equipment that removes microscopic particles standard vacuums miss. Construction projects test your carpet’s durability, but strategic protection planning transforms potential disasters into successful home improvements. Your flooring investment deserves protection that matches Seattle’s demanding construction environment.